- Published on
Clinical Procedures - Arterial Blood Sampling (ABG)
Indications
• Evaluation of arterial 02, COz, pH. etc.
• Measurement of response to therapeutic oxygen or diagnostic evaluation (e.g. exercise testing).
Contraindications
• Negative modified Allen's test
• Cutaneous or subcutaneous lesion at puncture site
• Surgical shunt (e.g. in a dialysis patient) in the limb proximal or distal to the puncture site
• Infection or known peripheral vascular disease in the limb
• Coagulopathy.
Risks
• Bleeding
• Haematoma
• Arteriospasm
• Infection
• False aneurysm formation
• Arterial occlusion.
Procedure Tips
• The key is carefully palpating the artery and lining the needle up to puncture it. Take your time!
• The majority of the pain comes from puncturing the skin. If no flash is seen immediately, try repositioning the needle by withdrawing without removing it from the skin
• If several attempts have failed, try a different location or ask for
• If there will be some delay in analysing the sample, store the blood filled syringe on ice
• Errors occur: if there is air in the syringe, if the sample is delayed in reaching the analyser (if this is anticipated, put the sample on ice), or if a venous sample is accidentally obtained.
Documentation
• Date, time, indication, consent obtained
• Artery punctured
• Modified Allen's test?
• How many passes?
• Any immediate complications
• Signature, printed name, contact details.
Equipment
• Gloves
• Sterile wipe (e.g. isopropyl alcohol)
• Cotton wool balls
• Tape
• Gauze
• Heparinized self-filling syringe and needle.
Choosing a Site
The radial artery at the level of the radial styloid is the usual site of choice as it is both superficial and easily accessible.
If the vessel is not obviously palpable, it is also possible to sample arterial blood at the brachial artery in the antecubital fossa or femoral artery just distal to the inguinal ligament.
Procedure: Radial Artery
• Introduce yourself, confirm the patient's identity, explain the procedure, and obtain informed consent
• Position the patient appropriately: sitting comfortably with arm placed on a pillow, forearm supinated, wrist passively dorsiflexed
• D Confirm ulnar arterial supply to the hand before starting (modified Allen's test):
• Compress the radial and ulnar arteries with your thumbs
• Ask the patient to make a fist and to open it
• The hand should appear blanched
• Release pressure from the ulnar artery and watch the palm
• The palm should flush to its normal colour
• D If not, there may be inadequate ulnar arterial supply and damage to the radial artery during blood taking may result in critical ischaemia. Test the other side
• Put on your gloves
• Identify the radial artery with index and middle fingers of your non-dominant hand
• Clean the site, beginning centrally and spiralling outwards
• Whilst the sterilizing solution dries, remove the needle and syringe from packaging and attach the needle to the end of the syringe
• Eject excess heparin from the syringe through the needle:
• © Check local equipment. Some heparinized syringes contain a heparinized sponge and excess heparin/air should not be expelled
• Warn the patient to expect a 'sharp scratch
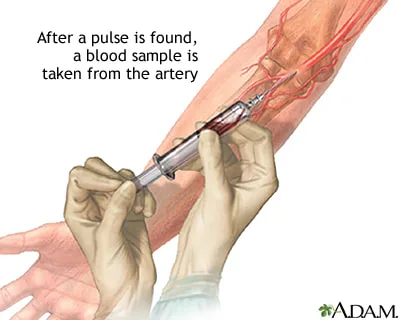
• Whilst palpating the artery (but not obliterating the pulsation), insert the needle just distal to your fingertips, bevel facing proximally, at an angle of 45-60° until a flashback is seen within the chamber of the needle
• Hold the syringe steady and allow it to fill itself with 1-2mL blood
• As you withdraw the needle, apply the gauze swab to the site, maintaining firm manual pressure over for at least 2 minutes
• Dispose of the needle and apply a vented cap, expelling any excess air:
• (This may not be necessary depending on your equipment see above).
Procedure: Brachial artery
• Similar procedure as above except...
• Position the elbow in extension. Angle the needle 60°
Procedure: Femoral Artery
• Position the patient with hip extended
• The pulse is felt 2cm below the midpoint between pubic symphysis and anterior superior iliac spine
• Angle the needle at 90° to the skin
• Pressure must be applied for at least 5 minutes.
Indications
• Evaluation of arterial 02, COz, pH. etc.
• Measurement of response to therapeutic oxygen or diagnostic evaluation (e.g. exercise testing).
Contraindications
• Negative modified Allen's test
• Cutaneous or subcutaneous lesion at puncture site
• Surgical shunt (e.g. in a dialysis patient) in the limb proximal or distal to the puncture site
• Infection or known peripheral vascular disease in the limb
• Coagulopathy.
Risks
• Bleeding
• Haematoma
• Arteriospasm
• Infection
• False aneurysm formation
• Arterial occlusion.
Procedure Tips
• The key is carefully palpating the artery and lining the needle up to puncture it. Take your time!
• The majority of the pain comes from puncturing the skin. If no flash is seen immediately, try repositioning the needle by withdrawing without removing it from the skin
• If several attempts have failed, try a different location or ask for
• If there will be some delay in analysing the sample, store the blood filled syringe on ice
• Errors occur: if there is air in the syringe, if the sample is delayed in reaching the analyser (if this is anticipated, put the sample on ice), or if a venous sample is accidentally obtained.
Documentation
• Date, time, indication, consent obtained
• Artery punctured
• Modified Allen's test?
• How many passes?
• Any immediate complications
• Signature, printed name, contact details.
Equipment
• Gloves
• Sterile wipe (e.g. isopropyl alcohol)
• Cotton wool balls
• Tape
• Gauze
• Heparinized self-filling syringe and needle.
Choosing a Site
The radial artery at the level of the radial styloid is the usual site of choice as it is both superficial and easily accessible.
If the vessel is not obviously palpable, it is also possible to sample arterial blood at the brachial artery in the antecubital fossa or femoral artery just distal to the inguinal ligament.
Procedure: Radial Artery
• Introduce yourself, confirm the patient's identity, explain the procedure, and obtain informed consent
• Position the patient appropriately: sitting comfortably with arm placed on a pillow, forearm supinated, wrist passively dorsiflexed
• D Confirm ulnar arterial supply to the hand before starting (modified Allen's test):
• Compress the radial and ulnar arteries with your thumbs
• Ask the patient to make a fist and to open it
• The hand should appear blanched
• Release pressure from the ulnar artery and watch the palm
• The palm should flush to its normal colour
• D If not, there may be inadequate ulnar arterial supply and damage to the radial artery during blood taking may result in critical ischaemia. Test the other side
• Put on your gloves
• Identify the radial artery with index and middle fingers of your non-dominant hand
• Clean the site, beginning centrally and spiralling outwards
• Whilst the sterilizing solution dries, remove the needle and syringe from packaging and attach the needle to the end of the syringe
• Eject excess heparin from the syringe through the needle:
• © Check local equipment. Some heparinized syringes contain a heparinized sponge and excess heparin/air should not be expelled
• Warn the patient to expect a 'sharp scratch
• Whilst palpating the artery (but not obliterating the pulsation), insert the needle just distal to your fingertips, bevel facing proximally, at an angle of 45-60° until a flashback is seen within the chamber of the needle
• Hold the syringe steady and allow it to fill itself with 1-2mL blood
• As you withdraw the needle, apply the gauze swab to the site, maintaining firm manual pressure over for at least 2 minutes
• Dispose of the needle and apply a vented cap, expelling any excess air:
• (This may not be necessary depending on your equipment see above).
Procedure: Brachial artery
• Similar procedure as above except...
• Position the elbow in extension. Angle the needle 60°
Procedure: Femoral Artery
• Position the patient with hip extended
• The pulse is felt 2cm below the midpoint between pubic symphysis and anterior superior iliac spine
• Angle the needle at 90° to the skin
• Pressure must be applied for at least 5 minutes.
0 Comments
