- Published on
Clinical Procedures - Central Venous Access: Internal Jugular Vein
Indications
• Inotrope therapy
• Parenteral nutrition (needs dedicated port)
• Poor peripheral access
• CVP measurement.
Contraindications
• Infected insertion site
• Thrombosed vein
• Coagulopathy.
Risks
• Pneumothorax
• Arterial puncture
• Haematoma
• Air embolism
• Arrhythmias
• Thrombosis
• AV fistula
• Infection
• Malposition.
Documentation
• Time, date, indication, and informed consent obtained
• Site and side of successful insertion
• Site, side, and complications of unsuccessful attempt
• Aseptic technique: gloves, gown, hat, mask, type of ster
• Local anaesthetic: type and amount infiltrated
• Technique used: e.g. landmark, ultrasound guidance
• Catheter used: length and number of lumens
• Aspirated and flushed
• Length of catheter in situ (length at skin)
• CXR: site of tip, absence/presence of pneumothorax
• Signature, printed name, and contact details.
Equipment
• Central line catheter pack:
• Central line (16cm length for right side, 20cm for left side), introducer needle, and 10mL syringe, guidewire, dilator, blade
• Large-dressing pack including a large sterile drape and gauze
• Normal saline
• Local anaesthetic for skin (1% lidocaine) with suitable
(25G) needle and syringe
• Sterile preparation solution (2% chlorhexidine)
• Sterile gloves, sterile gown, surgical hat and mask
• Trolley and ECG monitoring.
Procedure
• Introduce yourself, confirm the patient's identity, explain the procedure, and obtain written consent if possible
• Position the patient supine (1 pillow), tilt the bed head down, and place a spill sheet under the patient's head
• Attach ECG monitoring to the patient
• Turn the patient's head away from the side of insertion
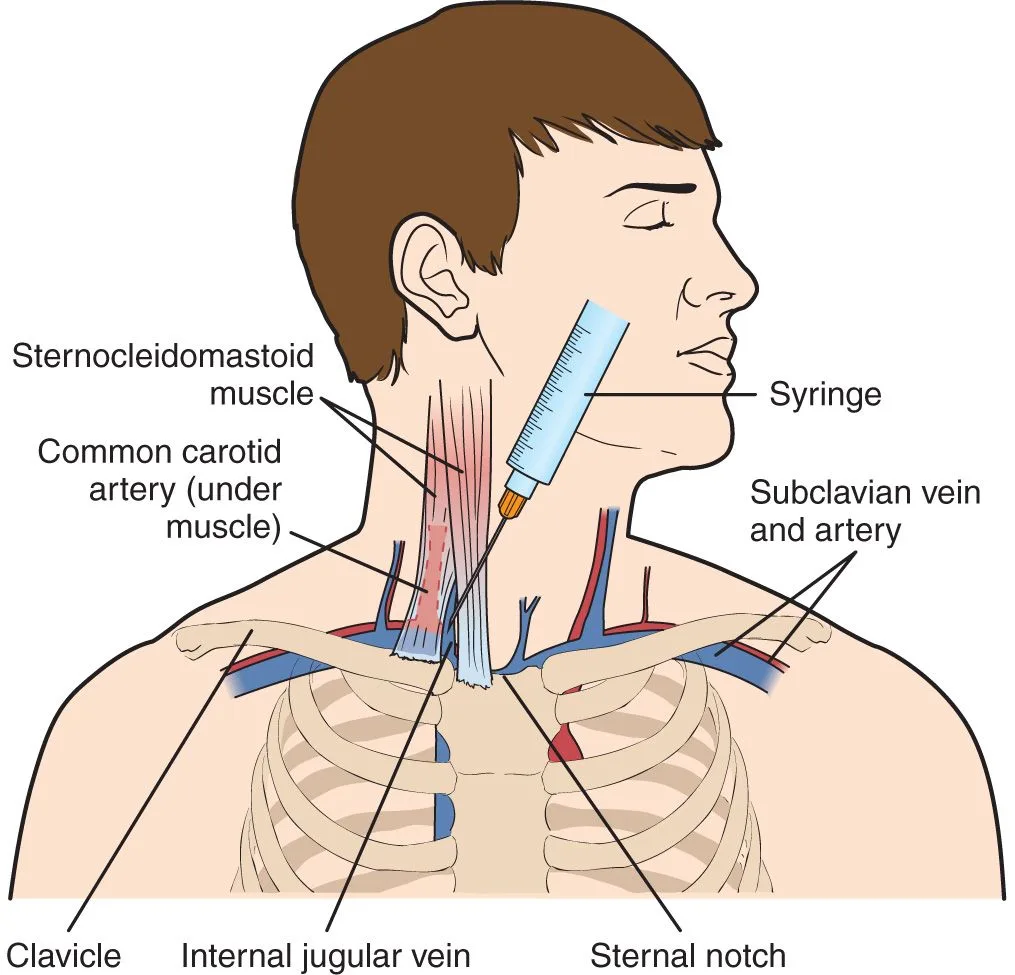
• Identify triangle formed by the sternal and clavicular heads of the sternocleidomastoid muscle and the clavicle
• Identify the entry point at the apex of the triangle
• Wash hands using a surgical scrub technique and put sterile gown and gloves
• With assistance, set up a trolley using an aseptic tech
Open the dressing pack onto the trolley creating a sterio
• Open the central line catheter pack and place onto the sterile field
Flush all lumens of the catheter with saline and clamp the ends
• Attach the introducer needle to a 10mL syringe
• Clean the area with sterile preparation solution and place a large drape around it
• Iniect local anaesthetic into the skin over the entry point
• Identify the carotid artery with your non-dominant hand
• Pierce the skin through the entry point with the introducer needle ensuring the needle is lateral to the artery
• Direct the needle at a 30° angle to the skin and advance using continuous aspiration, aiming for the ipsilateral nipple
• On hitting the vein, the syringe will fill with blood
• Keeping the needle still, carefully remove the syringe:
• Blood should ooze (not pulsate) through the hub of the needle
• Insert the guidewire through the needle and watch the ECG:
• Guidewires tend to be over 50cm in length but do not introduce more than 20cm as this may lead to arrhythmias
• Remove the needle over the guidewire ensuring one hand is always holding either the proximal or distal end of the wire
• Thread the dilator over the wire, firmly pushing it through the skin:
• This may require a small stab incision in the skin with a blade
• Aim to get 2-3cm of dilator into the vein, not its full length
• Check the guidewire has not been kinked by ensuring it moves freely through the dilator
• Remove the dilator over the guidewire and apply pressure over the site with gauze
• Thread the catheter over the guidewire until it emerges through the end of the distal port (unclamp this lumen!)
• This may require withdrawing some of the guidewire
• Holding the guidewire at its port exit site with one hi push the catheter through the skin with the other
• D Avoid handling the catheter, in particular its tip:
• Insert 16cm for a right-sided line and 20cm for a left-sided line
• Remove the guidewire:
• Blood should flow out through the end of the catheter
• Aspirate and flush all ports with normal saline
• Fix catheter to skin with a fixing device or sutures
• Cover with a transparent dressing
• Request a chest radiograph to confirm position.
Procedure Tips
• The right internal jugular vein is usually favoured due to its relatively straight course and the absence of the thoracic duct on this side
• Tilting the bed head down will minimize the risk of air embolism and help distend the veins of the neck.
Getting started
• Asking the patient to sniff or lift their head off the bed will help identify the sternocleidomastoid muscle
• Asking the patient to perform the Valsalva manoeuvre will distend the veins of the neck and help identify the internal jugular vein
• For added safety, you may wish to start by using a 21G (green') hypodermic needle instead of the introducer needle to 'seek out the vessel using the same technique
• Check clotting prior to insertion. Aim for IN <1.5 and platelets >50 x 109/L
• Minimize spillage.
During the procedure
• The internal jugular vein is relatively superficial and should be encountered within 2-3 cm. Do not continue advancing the needle if the vein has not been hit by this point
•Do not force the guidewire in. If there is resistance to guidewire insertion:
• Try lowering the angle of the needle making it more in line with the long-axis of the vessel
• Check you are still within the vein by aspirating with a syringe
• Try rotating the needle thereby moving the bevel away from any obstruction
• D Losing the guidewire can be disastrous. Always have one hand holding either the proximal or distal end of it
• The use of saline in the aspirating syringe may make flushing the no easier but also makes it more difficult to differentiate between a and arterial blood
• Always consider the possibility of an inadvertent arterial puncture
• Signs include pulsatile blood flow, high-pressure blood flow or blood bright red in colour (in the absence of hypotension or hypoxaemia)
• Do not dilate if in any doubt
• Consider sending blood for a blood gas to confirm venous placement.
Finishing off
• There is an increased incidence of vascular injuries and thrombosis with left-sided catheters mainly because of insufficient catheter depth leading to the tip abutting the lateral wall of the upper SVC. You must ensure left-sided lines are long enough so that their tip lies within the lower part of the SVC
• On the chest radiograph, confirm catheter position and the absence of a pneumothorax:
• The tip of the catheter should lie at the junction of the superior vena cava and right atrium which is approximately at the level of the carina.
Alternative approaches
• Anterior approach: midpoint of sternal head of sternocleidomastoid aiming towards ipsilateral nipple
• Posterior approach: posterior border sternocleidomastoid at the crossing of the external jugular vein aiming for the sternal notch.
Structures your needle may hit!
• In front of the vein: internal carotid artery (upper part of neck)
• Behind the vein: transverse process cervical vertebrae, sympathetic chain, phrenic nerve, dome of pleura, thoracic duct on left-hand side
• Medial to vein: internal carotid artery and cranial nerves IX-XII (upper part of neck), common carotid and vagus nerve (lower part).
Indications
• Inotrope therapy
• Parenteral nutrition (needs dedicated port)
• Poor peripheral access
• CVP measurement.
Contraindications
• Infected insertion site
• Thrombosed vein
• Coagulopathy.
Risks
• Pneumothorax
• Arterial puncture
• Haematoma
• Air embolism
• Arrhythmias
• Thrombosis
• AV fistula
• Infection
• Malposition.
Documentation
• Time, date, indication, and informed consent obtained
• Site and side of successful insertion
• Site, side, and complications of unsuccessful attempt
• Aseptic technique: gloves, gown, hat, mask, type of ster
• Local anaesthetic: type and amount infiltrated
• Technique used: e.g. landmark, ultrasound guidance
• Catheter used: length and number of lumens
• Aspirated and flushed
• Length of catheter in situ (length at skin)
• CXR: site of tip, absence/presence of pneumothorax
• Signature, printed name, and contact details.
Equipment
• Central line catheter pack:
• Central line (16cm length for right side, 20cm for left side), introducer needle, and 10mL syringe, guidewire, dilator, blade
• Large-dressing pack including a large sterile drape and gauze
• Normal saline
• Local anaesthetic for skin (1% lidocaine) with suitable
(25G) needle and syringe
• Sterile preparation solution (2% chlorhexidine)
• Sterile gloves, sterile gown, surgical hat and mask
• Trolley and ECG monitoring.
Procedure
• Introduce yourself, confirm the patient's identity, explain the procedure, and obtain written consent if possible
• Position the patient supine (1 pillow), tilt the bed head down, and place a spill sheet under the patient's head
• Attach ECG monitoring to the patient
• Turn the patient's head away from the side of insertion
• Identify triangle formed by the sternal and clavicular heads of the sternocleidomastoid muscle and the clavicle
• Identify the entry point at the apex of the triangle
• Wash hands using a surgical scrub technique and put sterile gown and gloves
• With assistance, set up a trolley using an aseptic tech
Open the dressing pack onto the trolley creating a sterio
• Open the central line catheter pack and place onto the sterile field
Flush all lumens of the catheter with saline and clamp the ends
• Attach the introducer needle to a 10mL syringe
• Clean the area with sterile preparation solution and place a large drape around it
• Iniect local anaesthetic into the skin over the entry point
• Identify the carotid artery with your non-dominant hand
• Pierce the skin through the entry point with the introducer needle ensuring the needle is lateral to the artery
• Direct the needle at a 30° angle to the skin and advance using continuous aspiration, aiming for the ipsilateral nipple
• On hitting the vein, the syringe will fill with blood
• Keeping the needle still, carefully remove the syringe:
• Blood should ooze (not pulsate) through the hub of the needle
• Insert the guidewire through the needle and watch the ECG:
• Guidewires tend to be over 50cm in length but do not introduce more than 20cm as this may lead to arrhythmias
• Remove the needle over the guidewire ensuring one hand is always holding either the proximal or distal end of the wire
• Thread the dilator over the wire, firmly pushing it through the skin:
• This may require a small stab incision in the skin with a blade
• Aim to get 2-3cm of dilator into the vein, not its full length
• Check the guidewire has not been kinked by ensuring it moves freely through the dilator
• Remove the dilator over the guidewire and apply pressure over the site with gauze
• Thread the catheter over the guidewire until it emerges through the end of the distal port (unclamp this lumen!)
• This may require withdrawing some of the guidewire
• Holding the guidewire at its port exit site with one hi push the catheter through the skin with the other
• D Avoid handling the catheter, in particular its tip:
• Insert 16cm for a right-sided line and 20cm for a left-sided line
• Remove the guidewire:
• Blood should flow out through the end of the catheter
• Aspirate and flush all ports with normal saline
• Fix catheter to skin with a fixing device or sutures
• Cover with a transparent dressing
• Request a chest radiograph to confirm position.
Procedure Tips
• The right internal jugular vein is usually favoured due to its relatively straight course and the absence of the thoracic duct on this side
• Tilting the bed head down will minimize the risk of air embolism and help distend the veins of the neck.
Getting started
• Asking the patient to sniff or lift their head off the bed will help identify the sternocleidomastoid muscle
• Asking the patient to perform the Valsalva manoeuvre will distend the veins of the neck and help identify the internal jugular vein
• For added safety, you may wish to start by using a 21G (green') hypodermic needle instead of the introducer needle to 'seek out the vessel using the same technique
• Check clotting prior to insertion. Aim for IN <1.5 and platelets >50 x 109/L
• Minimize spillage.
During the procedure
• The internal jugular vein is relatively superficial and should be encountered within 2-3 cm. Do not continue advancing the needle if the vein has not been hit by this point
•Do not force the guidewire in. If there is resistance to guidewire insertion:
• Try lowering the angle of the needle making it more in line with the long-axis of the vessel
• Check you are still within the vein by aspirating with a syringe
• Try rotating the needle thereby moving the bevel away from any obstruction
• D Losing the guidewire can be disastrous. Always have one hand holding either the proximal or distal end of it
• The use of saline in the aspirating syringe may make flushing the no easier but also makes it more difficult to differentiate between a and arterial blood
• Always consider the possibility of an inadvertent arterial puncture
• Signs include pulsatile blood flow, high-pressure blood flow or blood bright red in colour (in the absence of hypotension or hypoxaemia)
• Do not dilate if in any doubt
• Consider sending blood for a blood gas to confirm venous placement.
Finishing off
• There is an increased incidence of vascular injuries and thrombosis with left-sided catheters mainly because of insufficient catheter depth leading to the tip abutting the lateral wall of the upper SVC. You must ensure left-sided lines are long enough so that their tip lies within the lower part of the SVC
• On the chest radiograph, confirm catheter position and the absence of a pneumothorax:
• The tip of the catheter should lie at the junction of the superior vena cava and right atrium which is approximately at the level of the carina.
Alternative approaches
• Anterior approach: midpoint of sternal head of sternocleidomastoid aiming towards ipsilateral nipple
• Posterior approach: posterior border sternocleidomastoid at the crossing of the external jugular vein aiming for the sternal notch.
Structures your needle may hit!
• In front of the vein: internal carotid artery (upper part of neck)
• Behind the vein: transverse process cervical vertebrae, sympathetic chain, phrenic nerve, dome of pleura, thoracic duct on left-hand side
• Medial to vein: internal carotid artery and cranial nerves IX-XII (upper part of neck), common carotid and vagus nerve (lower part).
0 Comments
