- Published on
Clinical Procedures - Lumbar Puncture
Indications
• In the diagnosis of meningitis, subarachnoid hemorrhage and other diseases including non-infective meningitis and Guillain- Barré syndrome
• Treatment (short term) of idiopathic intracranial hypertension:
• In this case, consider removing between 10-20mL of CSF.
Contraindications
• Infected skin or subcutis at the site of puncture
• Coagulopathy or thrombocytopenia
• Raised intracranial pressure, particularly where there is a differential pressure between the supra- and infratentorial compartments such as seen in space-occupying lesions. If in doubt, image first!
Risks
• Post-procedure headache
• Infection
• Haemorrhage (epidural, subdural, subarachnoid)
• Dysaesthesia of the lower limbs
• Cerebral herniation (always check local procedures regarding contraindication to lumbar puncture and whether to perform CT head first).
Procedure Tips
• Always use the smallest gauge spinal needle available:
• In some centres, 'pencil-point' needles are used which are associated with a much reduced incidence of post-procedure headache
• If the needle strikes bone and cannot be advanced, withdraw slightly, re-angle, and advance in a stepwise fashion until the gap is found
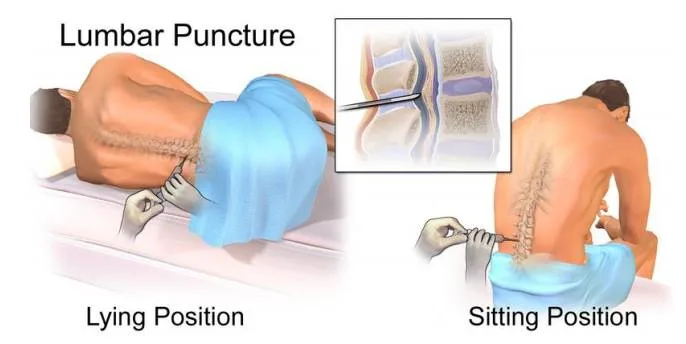
• Lumbar puncture can be performed with the patient sitting, leaning forwards. This is particularly useful if the patient is obese. However, pressure measurements will be erroneous if taken in this position.
Documentation
• Date, time, indication, and informed consent obtained
• Vertebral level needle inserted
• Number of passes before SF obtained
• Initial ('opening) pressure and final ('closing') pressure
• Amount and appearance of CSF
• Tests samples sent for
• Any immediate complications
• Signature, printed name and contact details.
Equipment
• Sterile gloves
• Sterile pack (containing drape, cotton balls, small bowl)
• Antiseptic solution (e.g. iodine)
• Sterile gauze dressing
• 1 × 25G (orange) needle
• 1 × 21G (green) needle
• Spinal needle (usually 22G)
• Lumbar-puncture manometer
• Three-way tap (may be included in a lumbar puncture kit)
• 5-10mL 1% lidocaine
• 2 × 10mL syringes
• 3 x sterile collection tubes and 1 biochemistry tube for glucose measurement.
Procedure
• Introduce yourself, confirm the identity of the patient, explain the procedure, and obtain verbal consent
• Position the patient lying on their left-hand side with the neck, knees, and hips flexed as much as possible:
Ensure that the patient can hold this position comfortably
• Place a pillow between the patient's knees to prevent the pelvis tilting
• Label the collections tubes *1, 2°, and '3"
• Identify the iliac crest. The disc space vertically below this (as you are looking) will be ~L3-L4
• Mark the space between the vertebral spines at this point with a pen
• Wash hands and put on the sterile gloves
• Unwrap all equipment and ensure it fits together correctly:
• It is usually useful to give the 3-way tap a few twists as it can stick
• Apply the drapes around the area and sterilize with the antiseptic solution and cotton balls in outward-spiral motion
• Inject the lidocaine (using a 10mL syringe and the orange needle) at the marked site to raise a small wheal
• Swap the orange needle for the green one and infiltrate the lidocaine deeper. © Take care to aspirate before injecting to ensure blood vessels are avoided
• Wait for ~1 minute for the anaesthetic to take effect
• Introduce the spinal needle through the marked site at about 90° to the skin, heading slightly toward the umbilicus.
Keep the bevel facing cranially
• Gently advance the needle to ~5 cm depth
• At this point, a further slight push of the needle should produce a 'give as the needle enters the subarachnoid space (this takes a little practice to feel with confidence)
• Withdraw the stilette from the needle. CSF should begin to drip out
• Measure the CSF pressure: connect the manometer to the end of the needle via the 3-way tap (the CSF will rise up the manometer allowing you to read off the number)
• Turn the tap such that the CSF within the manometer pours out in a controlled manner and further CS can drip freely
• Collect about 5 or 6 drops into each collection tube in the order in which they have been labelled
• Collect a few more drops into the biochemistry tube for glucose measurement
• Close the tap so that the manometer will measure the pressure at the end of the collection ('closing pressure)
• Remove the needle, tap, and manometer in one action
• Apply a sterile dressing
• Send the fluid for analysis:
• Cell count (bottles 1 and 3)
• Microscopy, culture and sensitivities (bottles 1 and 3)
• Biochemistry: glucose (biochemistry tube), protein (bottle 2)
• Advise the patient to lie flat for ~1 hour and ask nursing staff to check CNS observations
Clinical Procedures - Lumbar Puncture
Indications
• In the diagnosis of meningitis, subarachnoid hemorrhage and other diseases including non-infective meningitis and Guillain- Barré syndrome
• Treatment (short term) of idiopathic intracranial hypertension:
• In this case, consider removing between 10-20mL of CSF.
Contraindications
• Infected skin or subcutis at the site of puncture
• Coagulopathy or thrombocytopenia
• Raised intracranial pressure, particularly where there is a differential pressure between the supra- and infratentorial compartments such as seen in space-occupying lesions. If in doubt, image first!
Risks
• Post-procedure headache
• Infection
• Haemorrhage (epidural, subdural, subarachnoid)
• Dysaesthesia of the lower limbs
• Cerebral herniation (always check local procedures regarding contraindication to lumbar puncture and whether to perform CT head first).
Procedure Tips
• Always use the smallest gauge spinal needle available:
• In some centres, 'pencil-point' needles are used which are associated with a much reduced incidence of post-procedure headache
• If the needle strikes bone and cannot be advanced, withdraw slightly, re-angle, and advance in a stepwise fashion until the gap is found
• Lumbar puncture can be performed with the patient sitting, leaning forwards. This is particularly useful if the patient is obese. However, pressure measurements will be erroneous if taken in this position.
Documentation
• Date, time, indication, and informed consent obtained
• Vertebral level needle inserted
• Number of passes before SF obtained
• Initial ('opening) pressure and final ('closing') pressure
• Amount and appearance of CSF
• Tests samples sent for
• Any immediate complications
• Signature, printed name and contact details.
Equipment
• Sterile gloves
• Sterile pack (containing drape, cotton balls, small bowl)
• Antiseptic solution (e.g. iodine)
• Sterile gauze dressing
• 1 × 25G (orange) needle
• 1 × 21G (green) needle
• Spinal needle (usually 22G)
• Lumbar-puncture manometer
• Three-way tap (may be included in a lumbar puncture kit)
• 5-10mL 1% lidocaine
• 2 × 10mL syringes
• 3 x sterile collection tubes and 1 biochemistry tube for glucose measurement.
Procedure
• Introduce yourself, confirm the identity of the patient, explain the procedure, and obtain verbal consent
• Position the patient lying on their left-hand side with the neck, knees, and hips flexed as much as possible:
Ensure that the patient can hold this position comfortably
• Place a pillow between the patient's knees to prevent the pelvis tilting
• Label the collections tubes *1, 2°, and '3"
• Identify the iliac crest. The disc space vertically below this (as you are looking) will be ~L3-L4
• Mark the space between the vertebral spines at this point with a pen
• Wash hands and put on the sterile gloves
• Unwrap all equipment and ensure it fits together correctly:
• It is usually useful to give the 3-way tap a few twists as it can stick
• Apply the drapes around the area and sterilize with the antiseptic solution and cotton balls in outward-spiral motion
• Inject the lidocaine (using a 10mL syringe and the orange needle) at the marked site to raise a small wheal
• Swap the orange needle for the green one and infiltrate the lidocaine deeper. © Take care to aspirate before injecting to ensure blood vessels are avoided
• Wait for ~1 minute for the anaesthetic to take effect
• Introduce the spinal needle through the marked site at about 90° to the skin, heading slightly toward the umbilicus.
Keep the bevel facing cranially
• Gently advance the needle to ~5 cm depth
• At this point, a further slight push of the needle should produce a 'give as the needle enters the subarachnoid space (this takes a little practice to feel with confidence)
• Withdraw the stilette from the needle. CSF should begin to drip out
• Measure the CSF pressure: connect the manometer to the end of the needle via the 3-way tap (the CSF will rise up the manometer allowing you to read off the number)
• Turn the tap such that the CSF within the manometer pours out in a controlled manner and further CS can drip freely
• Collect about 5 or 6 drops into each collection tube in the order in which they have been labelled
• Collect a few more drops into the biochemistry tube for glucose measurement
• Close the tap so that the manometer will measure the pressure at the end of the collection ('closing pressure)
• Remove the needle, tap, and manometer in one action
• Apply a sterile dressing
• Send the fluid for analysis:
• Cell count (bottles 1 and 3)
• Microscopy, culture and sensitivities (bottles 1 and 3)
• Biochemistry: glucose (biochemistry tube), protein (bottle 2)
• Advise the patient to lie flat for ~1 hour and ask nursing staff to check CNS observations
0 Comments
