- Published on
Clinical Procedures - Recording a 12-lead ECG
The term '12-lead' relates to the number of directions that the electrical activity is recorded from and is not the number of electrical wires attached to the patient!
Equipment
• An ECG machine capable of recording 12 leads
• 10 ECG leads (4 limb leads, 6 chest leads):
• These should be attached to machine
• Conducting sticky pads ('ECG stickers*).
Procedure
• Introduce yourself, confirm the identity of the patient, explain the procedure, and obtain verbal consent
• Position the patient so that they are sitting or lying comfortably with their upper body, wrists, and ankles exposed
• Position the stickers on the patient's body
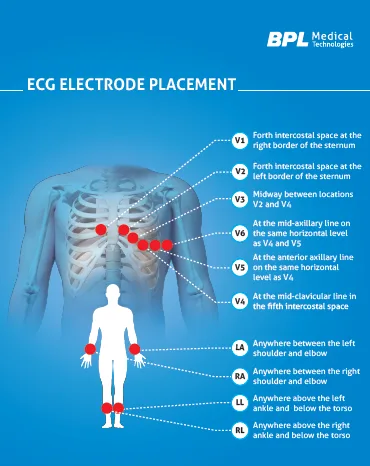
• The chest leads:
• V1: 4th intercostal space at the right sternal border
• V2: 4th intercostal space at the left sternal border
• V3: midway between V2 and V4
• V4: 5th intercostal space in the mid-clavicular line on the left
• V5: left anterior axillary line, level with V4
• V6: left mid-axillary line, level with V4
• The limb leads are often colour-coded:
• Red: Right arm. (Red: Right)
• Yellow: Left arm. (YeLLow: Left
• Green: right leg
• Black: left leg
• Attach the leads to the appropriate stickers
• Turn on the ECG machine
• Ask the patient to lie still and not speak for approximately 10 seconds whilst the machine records
• Press the button to record, usually marked 'analyse' or 'record'
Check the calibration and paper speed:
• 1mV should cause a vertical deflection of 10mm
• Paper speed should be 25mm/s (5 large squares per second)
• Ensure the patient's name, date of birth, as well as the date and time of the recording are clearly recorded on the trace
• Remove the leads, discard the sticky electrode pads. Correct positioning of the chest electrodes for a standard 12-lead ECG
Procedure Tips
• Encourage the patient to relax otherwise muscle contraction will cause interference
• If unable to relax, or access to the peripheries is difficult, the 'arm' leads can be placed at the shoulders and the leg leads at the groins
• Breathing may cause a wandering baseline; breath holding for 6 seconds whilst recording may alleviate this
• Ensure that you cleanse the area gently with an alcohol swab before attaching an electrode to ensure a good connection
• It may be necessary to cut chest hair to allow good contact and adhesion with the chest leads
• The AC mains electricity may cause interference. If this is the case, try turning off nearby fluorescent lights.
The term '12-lead' relates to the number of directions that the electrical activity is recorded from and is not the number of electrical wires attached to the patient!
Equipment
• An ECG machine capable of recording 12 leads
• 10 ECG leads (4 limb leads, 6 chest leads):
• These should be attached to machine
• Conducting sticky pads ('ECG stickers*).
Procedure
• Introduce yourself, confirm the identity of the patient, explain the procedure, and obtain verbal consent
• Position the patient so that they are sitting or lying comfortably with their upper body, wrists, and ankles exposed
• Position the stickers on the patient's body
• The chest leads:
• V1: 4th intercostal space at the right sternal border
• V2: 4th intercostal space at the left sternal border
• V3: midway between V2 and V4
• V4: 5th intercostal space in the mid-clavicular line on the left
• V5: left anterior axillary line, level with V4
• V6: left mid-axillary line, level with V4
• The limb leads are often colour-coded:
• Red: Right arm. (Red: Right)
• Yellow: Left arm. (YeLLow: Left
• Green: right leg
• Black: left leg
• Attach the leads to the appropriate stickers
• Turn on the ECG machine
• Ask the patient to lie still and not speak for approximately 10 seconds whilst the machine records
• Press the button to record, usually marked 'analyse' or 'record'
Check the calibration and paper speed:
• 1mV should cause a vertical deflection of 10mm
• Paper speed should be 25mm/s (5 large squares per second)
• Ensure the patient's name, date of birth, as well as the date and time of the recording are clearly recorded on the trace
• Remove the leads, discard the sticky electrode pads. Correct positioning of the chest electrodes for a standard 12-lead ECG
Procedure Tips
• Encourage the patient to relax otherwise muscle contraction will cause interference
• If unable to relax, or access to the peripheries is difficult, the 'arm' leads can be placed at the shoulders and the leg leads at the groins
• Breathing may cause a wandering baseline; breath holding for 6 seconds whilst recording may alleviate this
• Ensure that you cleanse the area gently with an alcohol swab before attaching an electrode to ensure a good connection
• It may be necessary to cut chest hair to allow good contact and adhesion with the chest leads
• The AC mains electricity may cause interference. If this is the case, try turning off nearby fluorescent lights.
0 Comments
