- Published on
Clinical Procedures - Taking Cervical Smear
Indications
• Screening for cervical cancer
• Post-treatment follow-up for cervical dysplasia or malignancy
• After hysterectomy for neoplasia or dysplasia.
Contraindications
• There are no real contraindications but care is needed in circumstances in which an adequate sample may be difficult to obtain or interpret.
Risks
• (Minor) spotting
• Uterine cramps.
Procedure Tips
• Cervical smears should not be performed during pregnancy. The increase in cervical mucus (and resultant decrease in the number of cells obtained) usually renders the sample inadequate and the results unreliable
• Neither abnormal vaginal bleeding or discharge or a visible or palpate cervical lesion is an indication for a cervical smear per se as it is a test for cervical atypia which is asymptomatic. However, a speculum examination should be performed to inspect the cervix and infection screening offered. A cervical smear can be offered to women who have not had a normal test within the usual screening period
• Ensure the woman knows when and how she will receive the results of the test and who to contact in case of problems
The following describes the technique for obtaining a sample for 'liquid-based cytology (LBC), now used by the majority of Units in the UK
Equipment
• Cusco's specula of different sizes
• Disposable gloves
• Request form
• Sampling device: plastic broom (Cervex-Brush®)
• LBC vial: preservative for sample
• Patient information leaflet.
Procedure
• Introduce yourself, confirm the patient's identity, ensure the patient understands the purpose of the procedure and has been given a patient information leaflet
• Explain the procedure and obtain informed consent
• Ensure a chaperone is available during the examination
• Write the patient's identification details on LBC vial
• Ask the patient to lie on her back on an examination couch with both knees bent up and let her knees fall apart: either with her heels together in the middle or separated
• Warm the speculum under running water and lubricate it with a water-based lubricant
• Using the left hand, open the lips of the labia minora to obtain a good view of the introitus
• Hold the speculum in the right hand with the main beg of the speculum in the palm and the closed blades pre between index and middle fingers
• Gently insert the speculum into the vagina held with wrist turned such that the blades are in line with the opening between the labia
• The speculum should be angled downwards and backwards due to the angle of the vagina
• Maintain a posterior angulation and rotate the speculum through 90° to position handles anteriorly
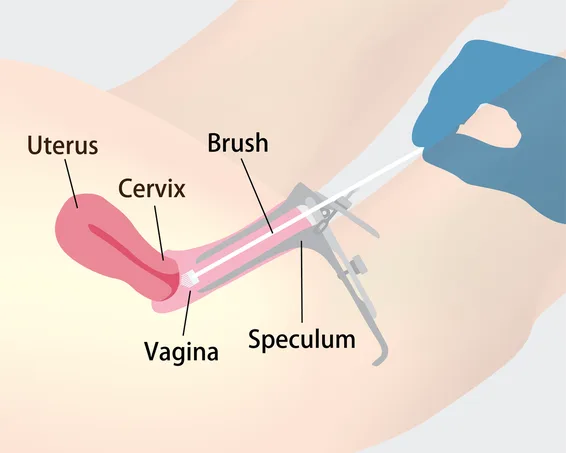
• When it cannot be advanced further, maintain a downward pressure and press on the thumb piece to hinge the blades open exposing the cervix and vaginal walls
• Ensure entire cervix is clearly visualized and note any obvious abnormalities or irregularity
• Once in optimum position, tighten the thumbscrew
• Insert the plastic broom so that the central bristles of the brush are in the endocervical canal and the outer bristles in contact with the ectocervix
• Using pencil pressure, rotate the brush 5 times in a clockwise direction:
• The bristles are bevelled to scrape cells only on clockwise rotation
• Rinse the brush thoroughly in the preservative (Thin Prep® or break off brush into the preservative (SurePath®
• Undo the thumbscrew and withdraw the speculum
•The blades should be held open until their ends are visible distal to the cervix to avoid causing pain
• Rotate the open blades in an anticlockwise direction to ensure that the anterior and posterior walls of the vagina can be inspected
• Near the introitus, allow the blades to close taking care not to pinch the labia or hairs
• Allow the patient to re-dress in privacy.
Documentation
• Date, time, indication, informed consent obtained
• Those present, including chaperone
• Date of last menstrual period and use of hormonal treatments
• Date of last smear and any abnormal results
• Any abnormalities identified
• Any immediate complications
Indications
• Screening for cervical cancer
• Post-treatment follow-up for cervical dysplasia or malignancy
• After hysterectomy for neoplasia or dysplasia.
Contraindications
• There are no real contraindications but care is needed in circumstances in which an adequate sample may be difficult to obtain or interpret.
Risks
• (Minor) spotting
• Uterine cramps.
Procedure Tips
• Cervical smears should not be performed during pregnancy. The increase in cervical mucus (and resultant decrease in the number of cells obtained) usually renders the sample inadequate and the results unreliable
• Neither abnormal vaginal bleeding or discharge or a visible or palpate cervical lesion is an indication for a cervical smear per se as it is a test for cervical atypia which is asymptomatic. However, a speculum examination should be performed to inspect the cervix and infection screening offered. A cervical smear can be offered to women who have not had a normal test within the usual screening period
• Ensure the woman knows when and how she will receive the results of the test and who to contact in case of problems
The following describes the technique for obtaining a sample for 'liquid-based cytology (LBC), now used by the majority of Units in the UK
Equipment
• Cusco's specula of different sizes
• Disposable gloves
• Request form
• Sampling device: plastic broom (Cervex-Brush®)
• LBC vial: preservative for sample
• Patient information leaflet.
Procedure
• Introduce yourself, confirm the patient's identity, ensure the patient understands the purpose of the procedure and has been given a patient information leaflet
• Explain the procedure and obtain informed consent
• Ensure a chaperone is available during the examination
• Write the patient's identification details on LBC vial
• Ask the patient to lie on her back on an examination couch with both knees bent up and let her knees fall apart: either with her heels together in the middle or separated
• Warm the speculum under running water and lubricate it with a water-based lubricant
• Using the left hand, open the lips of the labia minora to obtain a good view of the introitus
• Hold the speculum in the right hand with the main beg of the speculum in the palm and the closed blades pre between index and middle fingers
• Gently insert the speculum into the vagina held with wrist turned such that the blades are in line with the opening between the labia
• The speculum should be angled downwards and backwards due to the angle of the vagina
• Maintain a posterior angulation and rotate the speculum through 90° to position handles anteriorly
• When it cannot be advanced further, maintain a downward pressure and press on the thumb piece to hinge the blades open exposing the cervix and vaginal walls
• Ensure entire cervix is clearly visualized and note any obvious abnormalities or irregularity
• Once in optimum position, tighten the thumbscrew
• Insert the plastic broom so that the central bristles of the brush are in the endocervical canal and the outer bristles in contact with the ectocervix
• Using pencil pressure, rotate the brush 5 times in a clockwise direction:
• The bristles are bevelled to scrape cells only on clockwise rotation
• Rinse the brush thoroughly in the preservative (Thin Prep® or break off brush into the preservative (SurePath®
• Undo the thumbscrew and withdraw the speculum
•The blades should be held open until their ends are visible distal to the cervix to avoid causing pain
• Rotate the open blades in an anticlockwise direction to ensure that the anterior and posterior walls of the vagina can be inspected
• Near the introitus, allow the blades to close taking care not to pinch the labia or hairs
• Allow the patient to re-dress in privacy.
Documentation
• Date, time, indication, informed consent obtained
• Those present, including chaperone
• Date of last menstrual period and use of hormonal treatments
• Date of last smear and any abnormal results
• Any abnormalities identified
• Any immediate complications
0 Comments
