- Published on
Clinical Procedures - Central Venous Access: Subclavian Vein
Indications
• Inotrope therapy
• Parenteral nutrition (needs dedicated port)
• Poor peripheral access
• CVP measurement.
Contraindications
• Hyperinflated lungs (e.g. COPD patients)
• Coagulopathy
• Infected insertion site
• Thrombosed vein.
Risks
• Pneumothorax
• Haemorrhage
• Arterial puncture
• Air embolism
•Arrhythmias
• Thrombosis
• AV fistula
• Infection
• Malposition.
Documentation
• Time, date, indication, and informed consent obtained
• Site and side of successful insertion
• Site, side, and complications of unsuccessful attempt (s)
• Aseptic technique: gloves, gown, hat, mask, type of sterite
• Local anaesthetic: type and amount infiltrated
• Technique used: e.g. landmark, ultrasound guidance
• Catheter used: length and number of lumens
• Aspirated and flushed
• Length of catheter in situ (length at skin)
• CXR: site of tip, absence/presence of a pneumothorax
• Signature, printed name and contact details.
Equipment
• Central line catheter pack:
• Central line (16cm length for right side, 20cm for left side), introducer needle and 10mL syringe, guidewire, dilator, blade
• Large-dressing pack including a large sterile drape and gauze
• Normal saline
• Local anaesthetic for skin (1% lidocaine) with suitable
(25G) needle and syringe
• Sterile preparation solution (2% chlorhexidine)
• Sterile gloves, sterile gown, surgical hat and mask
• Trolley and ECG monitoring.
Procedure
• Introduce yourself, confirm the patient's identity, explain the procedure, and obtain written consent if possible
• Position the patient supine (1 pillow), place a sandbag between shoulder blades, and tilt the bed head down
• Attach ECG leads onto the patient making sure they are not in the surgical field
• Turn the patient's head away from the side of insertion
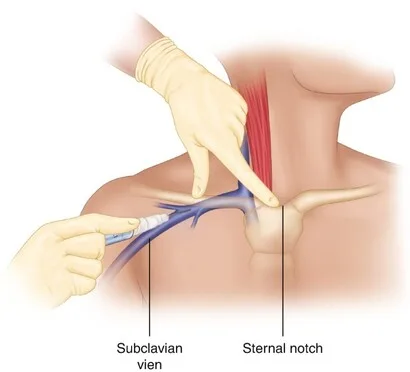
• Identify the entry point, just inferior to the midpoint of the clavicle
• Wash hands using a surgical scrub technique and put on the sterile gown and gloves
• With assistance, set up a trolley using an aseptic technique:
• Open the dressing pack onto the trolley creating as
• Open the central line catheter pack and place on to the sterile field
• Flush all lumens of the catheter with saline and clamp the ends
• Ensure the guidewire is ready for insertion
• Attach the introducer needle to a 10mL syringe
• Clean the area with sterile preparation solution and place a large drape around it
• Inject local anaesthetic into the skin over the entry point
• Insert the introducer needle under the clavicle at a very shallow angle almost parallel to the floor
• Advance the needle towards the sternal notch, aspirating as you advance
Structures your needle may hit!
• In front of the vein: clavicle, subclavius muscle
• Behind the vein: phrenic nerve, anterior scalene muscle, subclavian artery
• Below the vein: first rib, pleura
• On hitting the vein the syringe will fill with blood
• Keeping the needle still, carefully remove the syringe:
• Blood should ooze (not pulsate) through the hub of the needle
• Insert the guidewire through the needle and watch the ECG:
•
Guidewires tend to be over 50cm in length but do not introduce more than 20cm as this may lead to arrhythmias
• Remove the needle over the guidewire ensuring one hand is always holding either the proximal or distal end of the wire
• Thread the dilator over the wire, firmly pushing it through the skin:
• This may require a small stab incision in the skin with a blade
• Aim to get 2-3cm of dilator into the vein, not its full length
• Check the guidewire has not been kinked by ensuring it moves freely through the dilator
• Remove the dilator over the guidewire and apply gauze to the site to mop up any spills
• Thread the catheter over the guidewire until it emerges through the end of the distal port (unclamp this lumen!):
• This may require withdrawing some of the guidewire
• Holding the guidewire at its port exit site with one hand, push the catheter through the skin with the other
Avoid handling the catheter, in particular its tip:
• Insert 16cm for a right-sided line and 20cm for a line
• Remove the guidewire:
• Blood should flow out through the end of the car
• Aspirate and flush all ports with normal saline
• Fix catheter to skin with a fixing device or sutures
• Cover with a transparent dressing
• Request a chest radiograph to confirm catheter position and the absence of a pneumothorax.
Procedure Tips
Getting started
• Check clotting prior to insertion. Aim for INR <1.5, platelets >50 × 10°/L
• © Direct pressure cannot be applied on the subclavian vessels so this route should be avoided in patients with a coagulopathy
• © There is a greater risk of pneumothorax than with internal jugular cannulation. A subclavian approach should, therefore, be avoided in patients with hyperinflated lungs
• Minimize spillage
• The underside of the clavicle can be reached by first directing the needle onto the clavicle and then carefully walking off it. The angle of the needle should, however, remain parallel to the floor
• Asking an assistant to pull the ipsilateral arm caudally can improve access
• If a sandbag is not available, roll up a towel or wrap a 1L bag of fluid in a spill-sheet as an alternative.
During the procedure
• D The subclavian vein should be encountered within 3-4 cm. Do not continue advancing the needle if the vein has not been hit by this point
• D Do not force the guidewire in. If there is resistance to guidewire insertion:
• Try lowering the angle of the needle making it more in line with the length of the vessel
Check you are still within the vein by aspirating with a syringe
• Try rotating the needle thereby moving the bevel away from any
obstruction
• Catheter malposition, particularly into the ipsilateral internal jugular vein, is more common using the subclavian vein approach. Many guidewires have a ' ' tip. Directing the J' tip caudally may help correct placement
• D Losing the guidewire can be disastrous. Always have one hand holding either the proximal or distal end of it
• Always consider the possibility of an inadvertent arterial pressure
• Signs include pulsatile blood flow, high-pressure blood flow,or blood red in colour (in the absence of hypotension or hypoxemia
•Do not dilate if in any doubt
• Consider sending blood for a blood gas to confirm venous placement
• The use of saline in the aspirating syringe may make flushing the needle easier but also makes it more difficult to differentiate between venous and arterial blood.
Finishing off
• The incidence of vascular injuries and thrombosis is increased with left-sided catheters mainly due to insufficient catheter depth leading to the tip abutting the lateral wall of the upper SC. You must ensure left-sided lines are long enough so that their tip lies within the lower part of the SVC
• On the chest radiograph, confirm catheter position and the absence of
a pneumothorax:
•The tip of the catheter should lie at the junction of the SVC and right atrium which is approximately at the level of the carina.
Alternative approaches
• Medial approach: junction of medial and middle thirds of the clavicle
• Lateral approach: lateral to the mid-clavicular point. Often used with ultrasound guidance
Indications
• Inotrope therapy
• Parenteral nutrition (needs dedicated port)
• Poor peripheral access
• CVP measurement.
Contraindications
• Hyperinflated lungs (e.g. COPD patients)
• Coagulopathy
• Infected insertion site
• Thrombosed vein.
Risks
• Pneumothorax
• Haemorrhage
• Arterial puncture
• Air embolism
•Arrhythmias
• Thrombosis
• AV fistula
• Infection
• Malposition.
Documentation
• Time, date, indication, and informed consent obtained
• Site and side of successful insertion
• Site, side, and complications of unsuccessful attempt (s)
• Aseptic technique: gloves, gown, hat, mask, type of sterite
• Local anaesthetic: type and amount infiltrated
• Technique used: e.g. landmark, ultrasound guidance
• Catheter used: length and number of lumens
• Aspirated and flushed
• Length of catheter in situ (length at skin)
• CXR: site of tip, absence/presence of a pneumothorax
• Signature, printed name and contact details.
Equipment
• Central line catheter pack:
• Central line (16cm length for right side, 20cm for left side), introducer needle and 10mL syringe, guidewire, dilator, blade
• Large-dressing pack including a large sterile drape and gauze
• Normal saline
• Local anaesthetic for skin (1% lidocaine) with suitable
(25G) needle and syringe
• Sterile preparation solution (2% chlorhexidine)
• Sterile gloves, sterile gown, surgical hat and mask
• Trolley and ECG monitoring.
Procedure
• Introduce yourself, confirm the patient's identity, explain the procedure, and obtain written consent if possible
• Position the patient supine (1 pillow), place a sandbag between shoulder blades, and tilt the bed head down
• Attach ECG leads onto the patient making sure they are not in the surgical field
• Turn the patient's head away from the side of insertion
• Identify the entry point, just inferior to the midpoint of the clavicle
• Wash hands using a surgical scrub technique and put on the sterile gown and gloves
• With assistance, set up a trolley using an aseptic technique:
• Open the dressing pack onto the trolley creating as
• Open the central line catheter pack and place on to the sterile field
• Flush all lumens of the catheter with saline and clamp the ends
• Ensure the guidewire is ready for insertion
• Attach the introducer needle to a 10mL syringe
• Clean the area with sterile preparation solution and place a large drape around it
• Inject local anaesthetic into the skin over the entry point
• Insert the introducer needle under the clavicle at a very shallow angle almost parallel to the floor
• Advance the needle towards the sternal notch, aspirating as you advance
Structures your needle may hit!
• In front of the vein: clavicle, subclavius muscle
• Behind the vein: phrenic nerve, anterior scalene muscle, subclavian artery
• Below the vein: first rib, pleura
• On hitting the vein the syringe will fill with blood
• Keeping the needle still, carefully remove the syringe:
• Blood should ooze (not pulsate) through the hub of the needle
• Insert the guidewire through the needle and watch the ECG:
•
Guidewires tend to be over 50cm in length but do not introduce more than 20cm as this may lead to arrhythmias
• Remove the needle over the guidewire ensuring one hand is always holding either the proximal or distal end of the wire
• Thread the dilator over the wire, firmly pushing it through the skin:
• This may require a small stab incision in the skin with a blade
• Aim to get 2-3cm of dilator into the vein, not its full length
• Check the guidewire has not been kinked by ensuring it moves freely through the dilator
• Remove the dilator over the guidewire and apply gauze to the site to mop up any spills
• Thread the catheter over the guidewire until it emerges through the end of the distal port (unclamp this lumen!):
• This may require withdrawing some of the guidewire
• Holding the guidewire at its port exit site with one hand, push the catheter through the skin with the other
Avoid handling the catheter, in particular its tip:
• Insert 16cm for a right-sided line and 20cm for a line
• Remove the guidewire:
• Blood should flow out through the end of the car
• Aspirate and flush all ports with normal saline
• Fix catheter to skin with a fixing device or sutures
• Cover with a transparent dressing
• Request a chest radiograph to confirm catheter position and the absence of a pneumothorax.
Procedure Tips
Getting started
• Check clotting prior to insertion. Aim for INR <1.5, platelets >50 × 10°/L
• © Direct pressure cannot be applied on the subclavian vessels so this route should be avoided in patients with a coagulopathy
• © There is a greater risk of pneumothorax than with internal jugular cannulation. A subclavian approach should, therefore, be avoided in patients with hyperinflated lungs
• Minimize spillage
• The underside of the clavicle can be reached by first directing the needle onto the clavicle and then carefully walking off it. The angle of the needle should, however, remain parallel to the floor
• Asking an assistant to pull the ipsilateral arm caudally can improve access
• If a sandbag is not available, roll up a towel or wrap a 1L bag of fluid in a spill-sheet as an alternative.
During the procedure
• D The subclavian vein should be encountered within 3-4 cm. Do not continue advancing the needle if the vein has not been hit by this point
• D Do not force the guidewire in. If there is resistance to guidewire insertion:
• Try lowering the angle of the needle making it more in line with the length of the vessel
Check you are still within the vein by aspirating with a syringe
• Try rotating the needle thereby moving the bevel away from any
obstruction
• Catheter malposition, particularly into the ipsilateral internal jugular vein, is more common using the subclavian vein approach. Many guidewires have a ' ' tip. Directing the J' tip caudally may help correct placement
• D Losing the guidewire can be disastrous. Always have one hand holding either the proximal or distal end of it
• Always consider the possibility of an inadvertent arterial pressure
• Signs include pulsatile blood flow, high-pressure blood flow,or blood red in colour (in the absence of hypotension or hypoxemia
•Do not dilate if in any doubt
• Consider sending blood for a blood gas to confirm venous placement
• The use of saline in the aspirating syringe may make flushing the needle easier but also makes it more difficult to differentiate between venous and arterial blood.
Finishing off
• The incidence of vascular injuries and thrombosis is increased with left-sided catheters mainly due to insufficient catheter depth leading to the tip abutting the lateral wall of the upper SC. You must ensure left-sided lines are long enough so that their tip lies within the lower part of the SVC
• On the chest radiograph, confirm catheter position and the absence of
a pneumothorax:
•The tip of the catheter should lie at the junction of the SVC and right atrium which is approximately at the level of the carina.
Alternative approaches
• Medial approach: junction of medial and middle thirds of the clavicle
• Lateral approach: lateral to the mid-clavicular point. Often used with ultrasound guidance

0 Comments
