- Published on
Clinical Procedures – Central Venous Access – Ultrasound Guidance
Current recommendations in the UK are that ultrasound guidance should be considered when inserting any central venous catheter (NICE guidelines 2002).
Ultrasound Basics
• 'Ultrasound' refers to sound waves of such a high frequency as to be inaudible to the human ear (>20kHz).
• Medical ultrasound uses frequencies between 2-14MHz.
• The linear' (straight) transducer is the probe of choice for imaging the vessels and other superficial structures.
• The frequency of the probe should be between 7.5-10MHz for central venous access.
Basic Controls
• Frequency. Higher frequency may result in a better resolution but will not penetrate the tissues as deeply
• Gain. The gain control alters the amplification of the returned signals. This changes the greyscale of the image (can be thought of as increasing the brightness) but may not improve its quality
• Depth. The depth of the image on screen can be manually adjusted. It is wise to see the structures deep to the vessel to be cannulated
• Focal length. The focal point is usually displayed arrow at the side of the image. At this point, the image will
be sharpest but resolution of the deeper stit suffer. The focal point should be positioned in line with the vein to be cannulated.
Orientation
• By convention, the left of the screen should be that part of the patient to your left (i.e. the patient's right if you are facing the patient, the patient's left if you are scanning from behind them):
• Touch the edge of the probe and watch for the movement on screen to be sure you have the transducer the right way round.
Equipment
• Ultrasound machine (linear probe, high frequency)
• Sterile lubricating jelly
• Sterile probe cover.
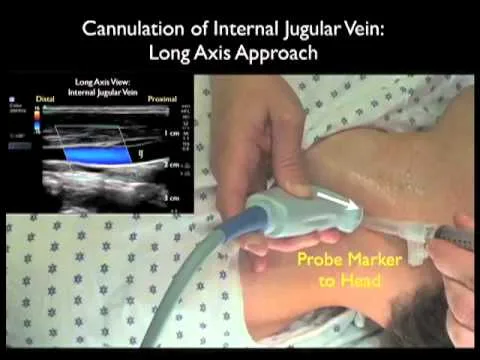
Procedure (Internal Jugular Vein Catheterization)
• With the patient positioned, squeeze sterile gel onto the patient's neck
• Hold the probe cover open like a sock. Ask an assistant to squeeze ultrasound gel into the base and carefully lower the probe in after it. You can then unfurl the probe cover along the length of the wire using aseptic technique
• Place probe over the surface markings of the vein (short axis of vessel)
• On the screen, look for two black circles side by side. These represent the vein and the artery
• Identify the vessels by pressing down with the probe:
• The vein will be compressible and the artery will not
• The artery will also be pulsatile.Note that the IV may also be pulsatile with the patient head down (the JVP)
• The artery is often circular in cross-section; the vein may be oval or a more complex ovoid shape
• Follow the course of the vein up the patient's neck and identify a site where the artery sits relatively medial to the vein. At this point, centre the vein onto the screen holding the probe still with your non-dominant hand
• Don't press too hard with the probe you may compress the vein
• Inject local anaesthetic into the skin around the midpoint of the probe using your dominant hand
• Insert the introducer needle through the skin at the midpoint of the probe
• Gently move the needle in and out to help locate the tip and its course on the screen:
•The tip of the needle will only be visualized if it is advancing in the same plane as the ultrasound beam
• Advance the needle (with continuous aspiration) towards the vein ensuring the tip is always in view
• On hitting the vein, blood will be aspirated into the syringe. Flatten the needle ensuring blood can still be aspirated. At this point, the probe can be removed and the vein be catheterized using the Seldinger technique
• The ultrasound can be used later in the procedure to ensure that the guidewire lies within the vein, if necessary.
Current recommendations in the UK are that ultrasound guidance should be considered when inserting any central venous catheter (NICE guidelines 2002).
Ultrasound Basics
• 'Ultrasound' refers to sound waves of such a high frequency as to be inaudible to the human ear (>20kHz).
• Medical ultrasound uses frequencies between 2-14MHz.
• The linear' (straight) transducer is the probe of choice for imaging the vessels and other superficial structures.
• The frequency of the probe should be between 7.5-10MHz for central venous access.
Basic Controls
• Frequency. Higher frequency may result in a better resolution but will not penetrate the tissues as deeply
• Gain. The gain control alters the amplification of the returned signals. This changes the greyscale of the image (can be thought of as increasing the brightness) but may not improve its quality
• Depth. The depth of the image on screen can be manually adjusted. It is wise to see the structures deep to the vessel to be cannulated
• Focal length. The focal point is usually displayed arrow at the side of the image. At this point, the image will
be sharpest but resolution of the deeper stit suffer. The focal point should be positioned in line with the vein to be cannulated.
Orientation
• By convention, the left of the screen should be that part of the patient to your left (i.e. the patient's right if you are facing the patient, the patient's left if you are scanning from behind them):
• Touch the edge of the probe and watch for the movement on screen to be sure you have the transducer the right way round.
Equipment
• Ultrasound machine (linear probe, high frequency)
• Sterile lubricating jelly
• Sterile probe cover.
Procedure (Internal Jugular Vein Catheterization)
• With the patient positioned, squeeze sterile gel onto the patient's neck
• Hold the probe cover open like a sock. Ask an assistant to squeeze ultrasound gel into the base and carefully lower the probe in after it. You can then unfurl the probe cover along the length of the wire using aseptic technique
• Place probe over the surface markings of the vein (short axis of vessel)
• On the screen, look for two black circles side by side. These represent the vein and the artery
• Identify the vessels by pressing down with the probe:
• The vein will be compressible and the artery will not
• The artery will also be pulsatile.Note that the IV may also be pulsatile with the patient head down (the JVP)
• The artery is often circular in cross-section; the vein may be oval or a more complex ovoid shape
• Follow the course of the vein up the patient's neck and identify a site where the artery sits relatively medial to the vein. At this point, centre the vein onto the screen holding the probe still with your non-dominant hand
• Don't press too hard with the probe you may compress the vein
• Inject local anaesthetic into the skin around the midpoint of the probe using your dominant hand
• Insert the introducer needle through the skin at the midpoint of the probe
• Gently move the needle in and out to help locate the tip and its course on the screen:
•The tip of the needle will only be visualized if it is advancing in the same plane as the ultrasound beam
• Advance the needle (with continuous aspiration) towards the vein ensuring the tip is always in view
• On hitting the vein, blood will be aspirated into the syringe. Flatten the needle ensuring blood can still be aspirated. At this point, the probe can be removed and the vein be catheterized using the Seldinger technique
• The ultrasound can be used later in the procedure to ensure that the guidewire lies within the vein, if necessary.
0 Comments
