- Published on
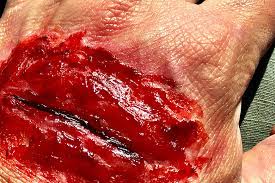
Clinical Procedures – Cleaning An Open Wound
Indications
• Wounds presenting to the Emergency Department.
Contraindications
• Major injuries: vascular compromise, tendon rupture, nerve injury, open factures or joints. These require senior advice and possibly specialist referral.
Risks
• Infection, failure to decontaminate wound
• Haemorrhage, scar, further surgery.
Procedure Tips
• Instead of using a syringe, a normal saline bag and giving set can be used
• For finger lacerations, a digital nerve block provides good analgesia:
• Don't use adrenaline as this can infarct the digit!
• In an ATLS scenario, open wounds should be photographed and covered with an antiseptic-soaked dressing and bandage. The photograph will allow wound inspection by others, without the need to remove bandages and contaminate the wound further
• D Always x-ray glass and metal wounds
• Small superficial wounds with no evidence of contamination on inspection or from the history can be closed with interrupted non-absorbable sutures:
• Patients need to be given information on wound care, signs of infection, and when the sutures should be removed
• Superficial face and head wounds can be closed with skin glue
•In some centres, facial wounds are only sutured by maxillofacial specialists to improve cosmetic results. Check your local policy.
Documentation
• Time, date, mechanism of injury
• Vaccination status
• Sensation and pulses
• Analgesia
• Check for nerve, tendon, and vascular injuries
• Draw diagram of wound site and inspection findings
• How much wash was used?
• If sutured, which suture and when should it be taken out?
• Signature, printed name, and contact details.
The treatment of open wounds depends on:
• Depth and area
• Contamination
• Tissue loss (e.g. vascular, tendon, or nerve damage)
• Other (open fractures or joints, compartment syndrome).
Equipment
• Anaesthetic (local or general)
• Gloves, mask, and eye protection
• 2 x kidney dish (1 for cleaning solutions, 1 below the wound to collect used wash)
• 50mL syringe
• Swabs
• Forceps, scalpel, scissors
• Normal saline or antiseptic solution
• Sterile drapes.
Procedure
Wound cleaning
• Take swabs of wound for microbiology if visibly contaminated or history suggestive
• Clean wound with copious amounts of normal saline and/or water-based antiseptics using syringe
• Clean wound with swabs from the centre outwards to prevent further wound contamination:
• Do not use high-pressure irrigation (can push debris deeper).
Inspection and removal of gross contamination
• Photograph wound with adjacent ruler to document size
• Look for gross contamination and remove with forceps.
Deep palpation
• Methodically check each area visually and with deep palpation to avoid missing contaminants and tissue injuries
• Use forceps and wound retraction to examine all areas
• Look for any damage to blood vessel, nerves, and tendons
• Move the joints above and below the injury whilst looking at the tendon as it moves. D Tendon injuries are easily missed if the wound was incurred in a different position to the resting state (e.g. in clenched fist injury)
If deep tracts are palpated, the wound may need to be extended into the skin above it to allow adequate drainage.
Excision of dead tissue
• Cut away any dead tissue until healthy tissue is visible.
Maintaining drainage
• Any cavity must be adequately drained. In the emergency department, a wick is used rather than a drain
• Siting a drain:
• Identify the most dependent part of the cavity
• Use artery forceps to identify the depth of the tract
• With scissors, taper and cut a corrugated drain to fit into the tract
•Pass the tip of the forceps from the tract base so they can be seen at the skin surface
• Make an incision over the forceps to allow the drain to be sited
• Grasp the tip of the drain with the forceps and ease it into the wound
• To stop the drain dislodging, a loose suture can be placed into the skin and either around the drain or sutured through one of its corrugations. (This depends on the type of drain used.)
• Finally, wash the wound with antiseptic solution
• A pack can be placed into the wound and cavities, to keep small tracts open and allow drainage
• A loose suture can be placed to keep the pack in place.
• Contaminated wounds and bites should not be sutured closed due to high infection risk and the need for adequate drainage.
Dressing
• A non-stick dressing should be placed over the wound and edges, followed by gauze and bandage or tape
• Further wound inspection and debridement is required at 48-96 hours.
Examine sooner in heavily contaminated wounds.

0 Comments
